Introduction
Code signing ensures that your installer software is authentic, secure, and trusted by Windows and antivirus software. Our installer builder software Paquet Builder fully supports Microsoft Azure Trusted Signing, a cloud-based alternative to traditional code-signing certificates.
This tutorial will show you how to configure Paquet Builder to sign your installers and Self-Extracting packages using Azure Trusted Signing.
Why Use Azure Trusted Signing?
Azure Trusted Signing offers several advantages over traditional code signing:
✅ Lower Cost – No need for expensive certificate renewals. It’s a pay-as-you-go model. Here are the costs from the Azure Trusted Signing service:

As you can see, for just under $120 per year, you can sign up to 5,000 executable files per month. Meanwhile, traditional code-signing certificates cost several hundred dollars per year.
✅ No USB Tokens – No hardware security module (HSM) or USB required.
✅ Cloud-Based Security – Signing keys are stored securely in Microsoft’s cloud.
✅ Microsoft Trust & Compliance – Meets industry security standards and is widely accepted on Windows.
By using Azure Trusted Signing, your signed installers will be recognized by Windows SmartScreen control and trusted by security systems:

Prerequisites
Before configuring Paquet Builder, you need:
📌 A Trusted Signing Account with a verified certificate profile.
👉 See our tutorial to set up a Trusted Signing Account.
Your Azure account must have the Trusted Signing Certificate Profile Signer role. You can verify that in the Access control (IAM) > Role assignments page of your Trusted Signing account.
📌 Microsoft Azure CLI installed on your system.
📌 Trusted Signing Client Tools installed.
📖 How to create an Azure Trusted Signing account? 👉 Step-by-Step Guide
📖 Official Microsoft Documentation: 👉 Azure Trusted Signing Integration
Step 1: Install Required Tools
Before signing your installers with Paquet Builder, install the necessary tools:
1️⃣ Install Trusted Signing Client Tools
🔗 Download the MSI Installer:
👉 Trusted Signing Client Tools
Once installed, you should see the tools into this folder:
C:\Users\LOGIN NAME\AppData\Local\Microsoft\MicrosoftTrustedSigningClientTools\
Replace `LOGIN NAME` with your actual Windows username.
2️⃣ Checking if SignTool is installed
💡 Default path for SignTool after installation:
C:\Program Files (x86)\Windows Kits\10\bin\10.0.22621.0\x64\signtool.exeIf SignTool.exe is not found, download and install the Windows SDK:
1️⃣ Locate and run winsdksetup.exe (Windows SDK installer) in the tools folder as explained above.
2️⃣ During installation, select the following component: Windows SDK Signing Tools For Desktop Apps
3️⃣ Complete the installation and verify that signtool.exe is available now.
📖 Alternatively, you can manually download the official Microsoft SDK:
👉 Windows SDK Download
3️⃣Install Microsoft Azure CLI for Windows
🔗 Download and Install:
👉 Azure CLI Installer
💡 Why Install Azure CLI?
- Used for logging into Azure before signing packages.
- Required for managing Azure credentials securely.
📖 Learn more about installing Azure CLI
Step 2: Configure Paquet Builder for Azure Trusted Signing
Once the tools are installed, configure Paquet Builder for Azure Trusted Signing.
1️⃣ Open Paquet Builder
Navigate to 🛠 Digitally Sign Package (see screenshot below).
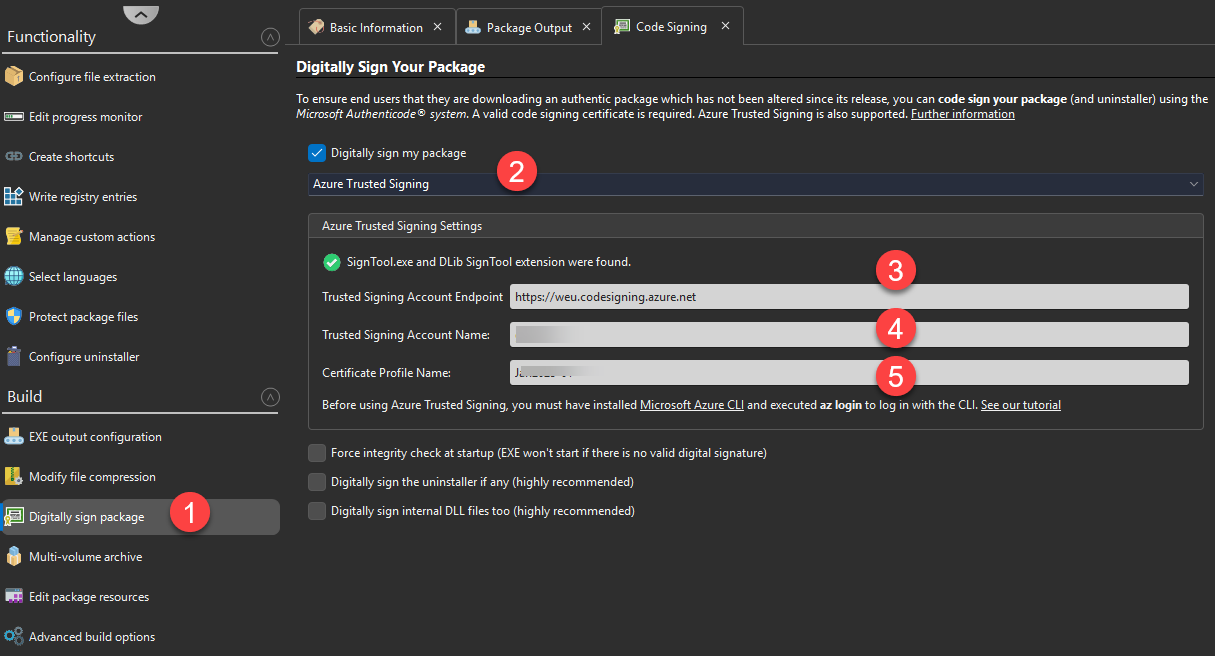
2️⃣ Select Azure Trusted Signing
Under Code Signing, choose Azure Trusted Signing as the signing method.
3️⃣ Enter Required Azure Credentials
Fill in the following fields:
| Field | Description |
|---|---|
| Trusted Signing Account Endpoint | Your Azure Trusted Signing region URL (see table below). |
| Trusted Signing Account Name | Your Azure account name. |
| Certificate Profile Name | The certificate profile for signing (screenshot below). |

💡 Make sure to select the endpoint matching the region where your Azure Trusted Signing account was created:
| Region | Endpoint URL |
|---|---|
| East US | https://eus.codesigning.azure.net |
| West US 3 | https://wus3.codesigning.azure.net |
| West Central US | https://wcus.codesigning.azure.net |
| West US 2 | https://wus2.codesigning.azure.net |
| North Europe | https://neu.codesigning.azure.net |
| West Europe | https://weu.codesigning.azure.net |
Step 3: Authenticate with Azure CLI
Before compiling your package with Paquet Builder, authenticate with Azure CLI.
1️⃣ Open PowerShell or Command Prompt
2️⃣ Run the following command:
az login
3️⃣ A browser window will open – log into your Azure account.
💡 Once authenticated, you can build and sign installers directly from Paquet Builder!
Step 4: Build and Sign Your Installer
1️⃣ Click Build
Paquet Builder will:
✔ Compile your installer.
✔ Automatically invoke SignTool using Azure Trusted Signing.
✅ Done! Your installer is now signed and trusted:

Conclusion
With Paquet Builder and Azure Trusted Signing, you can:
✔ Securely sign installers without local certificates.
✔ Eliminate the need for USB tokens or HSMs.
✔ Ensure your installer software is trusted by Windows and antivirus software.
🔹 Need help? Contact us or check the Microsoft FAQ.